The Amazon Pay UPI ID is used when you select a payment method for online payments. You have to select a linked bank account with your Amazon UPI ID. So, first of all, you have to create Amazon UPI ID by creating an account with Amazon. If you are interested in creating Amazon UPI ID, this tutorial will help you.
Amazon Pay UPI is one of the best mobile payment services you can use for various online bill payments. It is secure, reliable, and easy to use for users. You can easily set up Amazon Pay UPI for online bill payments in a few steps.
It also offers cashback facilities for bill payments to the users on their online purchases. So this app is suitable for users who want to get cashback on mobile recharge, DTH recharge, bill payment and fund transfer.
Create an Amazon Account
You can create an account on Amazon with your mobile number, but for Amazon UPI ID, you need a mobile number linked to your bank account. So, you have to install the ‘Amazon app‘ from the Google Play store and then create an account on Amazon.
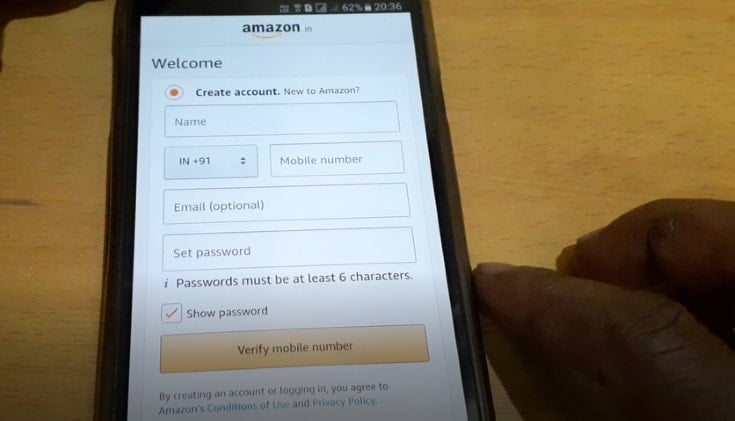
Open the Amazon app, and follow the steps below:
- Select Language, Hindi or English, and tap on ‘create an account.
- Enter your good name and registered mobile number linked with your bank account.
- Email ID is optional; if you have, then enter it.
- Create a password (minimum of six characters).
- Tap on ‘Verify mobile number.’
- You will get an OTP via SMS on your registered mobile number. Enter OTP and submit. That’s it, and your Amazon account has been created. The next step is to create your Amazon UPI ID.
Steps to Create Amazon Pay UPI ID
It’s a very simple process, and you can create an Amazon Pay UPI ID in a few steps.

1: Open the Amazon mobile app and select the menu bar at the top left of the home screen. You will get the ‘Amazon Pay‘ option; tap on ‘Amazon pay‘.
2: The ‘Get Started‘ option will appear on the next screen to Set up Amazon Pay UPI. Click on the ‘Get started‘ option and tap on the ‘Proceed‘ on the next screen.

3: The Amazon Pay UPI will verify your mobile number. If you have two SIM cards, select one linked to your bank account, and click on the ‘Proceed‘ option.
4: The mobile number will be verified again, and there will be an option to select the bank. So here, select a bank where you have an account.
Amazon Pay UPI ID
5: Now, the Amazon Pay UPI will verify your mobile number, whether it is linked to a bank account or not. If your mobile number is linked with the bank account, it will be verified, and at the same time, your Amazon Pay UPI ID will be set by default.
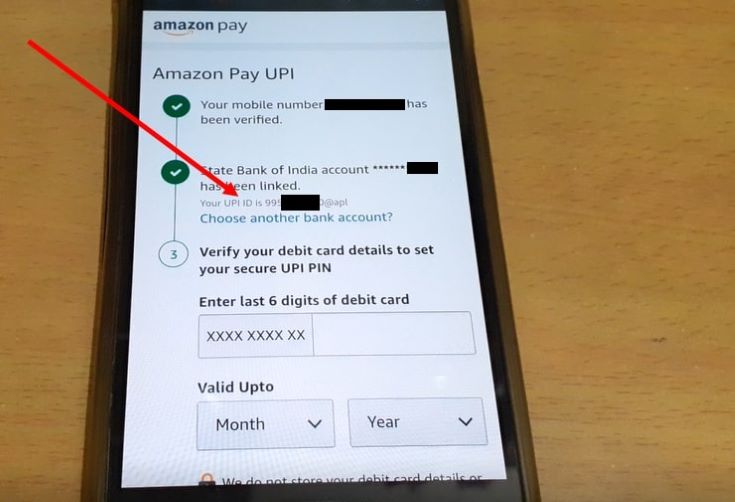
6: Enter the last six digits, month and year of your debit card, and click on the ‘Set your UPI PIN‘ option. You will get an OTP on your registered mobile number, which will be auto-detected. Enter the 4/6 digit UPI PIN and then confirm it.
This way, your Amazon Pay UPI ID will be created, and you can use it for online payments anywhere.
FAQs
A: Select the payment method page, and select your linked bank account with your Amazon Pay UPI ID. After confirming your order, enter your UPI PIN to complete the payment.
A: Open your Amazon app, go to the Amazon Pay Dashboard and tap on Amazon Pay UPI. If you have more than one SIM in your phone, select the SIM card associated with your bank account and tap on Verify your mobile number. Select your bank from the list and follow the on-screen instructions.
A: You can add money through your linked bank account in Amazon Pay UPI.
CONCLUSION:
In this way, you can create Amazon Pay UPI, Amazon UPI ID and UPI PIN without hassle. I hope this step-by-step tutorial is useful for you; please share it with your friends.


